Assalamualaikum wbt.
So, last Monday on 17th
September 2018 was a public holiday in Japan called Respect for the Aged Day or
敬老の日 (read: keiro no hi). It was
celebrated to honor and respect the elderly citizens. However, I’m not going to
tell more about that day, I’m going to write what I was doing on that day. As
the title mentioned above, I joined an activity called Mizuhiki in 原宿 (read: Harajuku) which is just 16
minutes from my house by train. Honestly, this activity is more to ladylike
activity but if men want to try as well, just go ahead. You just need to be
more patient because I did lost mine when I tried for the second time.
What is Mizuhiki and the history behind
it? Mizuhiki is a traditional Japanese art form made from a special cord.
Mizuhiki is often tied into a knot around gifts, with each knot having a
particular meaning. Each of these knot is tailored for a specific event, such
as a wedding ceremony or birth. The history of Mizuhiki knot goes as far back
as 607 AD, when a Japanese delegate presented a gift from China to the Japanese
emperor. This gift was decorated with a red and white twine knot symbolizing
‘safe journey’. Since then, the Japanese followed the same style, recreating
the knot and starting a tradition of presenting a gift box with a Mizuhiki
knot.
Picture 1: Example of
Mizuhiki knot
There are many types of knot in Mizuhiki
and one of it is called あわじ結び (read:
Awaji musubi) or Awaji knot. This is the
one that I learned during the class. This is the simple one and it is also
called as 書生結び (read: Shosei musubi). While
tying this knot, you can move the cord easily and it is not likely to get
loose. For beginner, I prefer to learn tying this kind of basic knot. So, how
the Awaji knot looks like? You can prefer in the picture below. I’m proud to
say that I made this one ho ho ho. Well, I live, study and work in Japan. It’s
not wrong right to learn simple Japanese traditional art and show it off to you
guys.
Picture 2: Awaji knot
As it is quite difficult for me to
describe how I tie this knot, I’ll just put a few picture below. This Awaji
knot is made up of five cords. During the class, my teacher allowed me to pick
any colors and types of cords that I like. As a beginner, she advised me to use
all five same types of cord with different colors as it will be much easier to
tie it. The picture 2 is the first one that I made. I chose pink and white colors
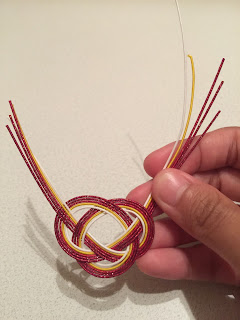
with same cords. Then, for the second one, I chose two types of cords with red,
yellow and white colors.
Firstly, I tie the Awaji knot by using
only three cords with red color. Then, after I got the shape, I put another two
cords of yellow and white. I cut the middle by using scissor and apply the glue
to make sure that the Awaji knot will not loose and stay in shape.
Picture 3: Tie it into 涙 (read: namida) tear-shape
Picture 4: Using three red cords
Picture 5: Add another yellow cord
Picture 6: Add the last white cord
Picture 7: Cut the middle with scissor
Picture 8: The second Awaji knot is done
Picture 9: Same Awaji knot with different colors
This might look like a simple type of
traditional knot but I think it’s worth it to learn because of the history
behinds it. One of the reason why I have so much interest in Japanese culture
because even in this simple knot, there is a message that can be conveyed. It’s
wonderful to know how a message can be conveyed to others without using words
and just tie a beautiful, simple knot. And I wonder if we have traditional knot
in Malay culture as well? Let me know and maybe I will learn it in the future.
For those in Japan and those who plan to come to Japan, you can go to this place
called, Komorebi located in Harajuku. You just pay around 1500 Yen for beginner
lesson. That’s all for now.
Reference:


